Monday, September 19, 2011

Okay ~ Let's Face It... This Needed Some Major Help.

Okay, at one point in time this was a really cute, little, mahogany bench with tapestry on the seats. Yes, it was probably an 80's piece and sat in someone's foyer. Now, let's jump forward to 2011 when we just can't have 80's mahogany in our cottage home.


 Right away, I mean literally just as I removed it from my car, after returning to my shop from purchasing it, I began taping off the tapestry so I could paint around it with Annie Sloan's Old White. With all the spindles, it took a little longer than usual, but it basically went pretty fast.

Here it is with one coat of Annie Sloan and blue tape...


All it needed was two coats of Annie and then the clear and bown wax.  And, of course, a little elbow grease!  I've added some burlap for the seat cushions, but I am also planning to make a floral, ruffled cushion to cover both squares of burlap.  I will re-post when it is complete!

Do you recognize the "Pig Powder" sign?
Idea from Miss Mustard Seed!!! Thank you for all your wonderful ideas!

Wednesday, August 31, 2011

Frenchy French French

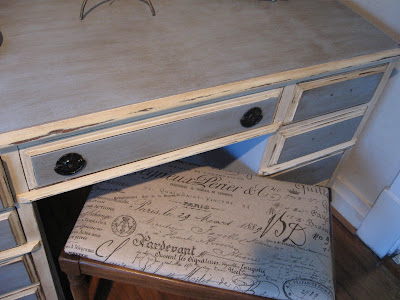
That is what I think of when I see this desk... Frenchy French French! The colors, the old world look and the soon-to-be hardware. I found this Bassett desk at a nearby shop in Kentucky. It was dark, not-so-attractive and needed some major love and attention.
Poor Little Thing!
Even though it was a less than a charmer, it was definitely a diamond in the rough. It was very heavy ~ my first indication that a piece of furniture is a good piece; the drawers were very smooth operators (kind of like Sade's song); and it was just waiting for someone to take her home out of the dingy dark corner where she sat.

I began by taping the drawers so I could start my work. It was exciting because I was on a mission to make a major transformation! I was in a hurry, too, since I was curious just how quickly I could transform her!

Knowing from the start my color scheme, I jumped right in and got busy. Here is the first step of color ~ Annie Sloan's Louis Blue and Old White.

Then the REAL fun began...
The brown wax was added, just like my blogger friends add to their pieces for the rich, old world look. I could hardly wait to see how it was going to look. At first it was a little too BLUE and I definitely knew that I wanted a more tempered, blue end-result. I added more brown wax until the perfect finish emerged!


The little piano bench seemed to be the perfect partner for this Frenchy French French Desk. The French writing on the fabric was just amazing! 

Now, for the final phase... the hardware. I found this vintage set of bronze-colored drawer pulls on Ebay! PERFECTO!!!

Thursday, August 11, 2011

These Lonely Pieces Find Common Ground ~ Color ~ and Become a Duo Fantastique!

"Provence" Takes Center Stage
As It Adds New Life To These Once Dull Pieces. 


Tuesday, August 2, 2011

Charming With Chalk Paint!

It is so exciting to see "Before" photos of ANYTHING when the end results are BETTER than you had expected!  Here is a lovely Henredon dining table and 6 chairs, probably from the early 1980's.  The set was in need of some major TLC!!!


Can We All Say... "Teal and Peach ~ Early 1980's Fabric" 

One of the arm chairs was in need of some cane repair. It looked as if this chair may have been the "Papa Chair" at the head of the table and was given some extra hearty wear! It is interesting how one can imagine how a piece was used, or by whom, when the wear-and-tear is observed.
I ordered a kit that included the cane, wooden wedges, glue and spline (the "edging" piece that holds the cane in place). It  was basically quite simple once I removed the old spline. It took some patience, but once I began following the directions, it seemed like I was finished in no time!

Deciding to keep the pretty, natural wooden table top was easy! It was in great shape and it just seemed like the right look for the table. I taped off the table top to protect it and began painting with Annie Sloan's Chalk Paint - Old White.


Since I had several other projects going on at the same time, like a HUGE faux finishing job at a local restaurant, it took me several weeks to complete the table, 6 chairs, repairing the cane, and covering the chair bottoms.

About mid-way throught the project...

After 2 wonderful coats of chalk paint, clear wax, brown wax, distressing and a lot of patience, VOILA, I was finally finished! Just before I actually completed the project, a college friend, from years ago, saw photos of the set that I posted on Facebook and she is now the proud owner of the repurposed table and chairs!


Hope you enjoy your new dining table and chairs, Cindy!!!